The simplest and most affordable way to make a rough coating for a room for any purpose is to arrange a concrete floor on the ground. Although the procedure does not require special skills, the quality of the final floor directly depends on the observance of certain technical points related to its arrangement. How to make a concrete floor on the ground and how to pour a concrete floor on the ground, we will consider further.
Characteristics and components of the concrete floor on the ground
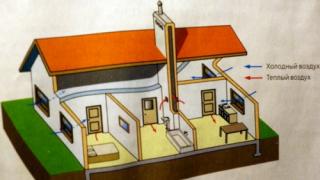
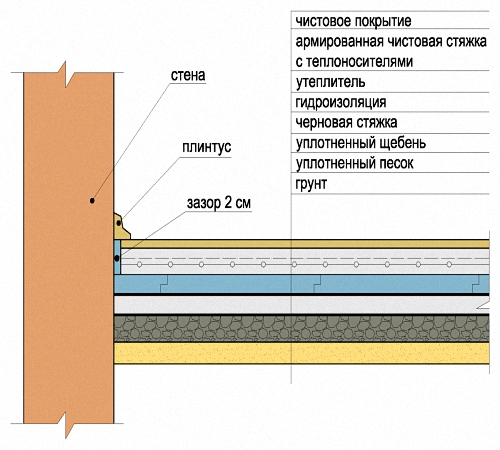
When arranging any floor on the ground, the main thing is to ensure its high-quality thermal insulation. It is because of its installation that in the end it is possible to obtain a multi-layered floor, called a pie.
The production of floors on the ground directly depends on the type of soil and its features. The first and most important requirement for the soil is the level at which groundwater is laid, which should be at least 500-600 cm from the surface. Thus, it will be possible to avoid movements and heaving of the soil, which will be reflected on the floor. In addition, the soil should not be loose.
For better performance of all work, it is necessary to determine the requirements for the installation of thermal insulation, which are as follows:
- prevention of heat loss;
- protection against groundwater penetration;
- providing sound insulation;
- prevention of vaporization;
- ensuring a comfortable and healthy indoor climate.
A warm concrete floor on the ground contains the following components and stages of work:
1. Cleansing the soil from the top layer. In addition, the surface is carefully leveled.
3. Then a pillow of gravel or crushed stone is installed on the sand. It is this area that prevents the rise of groundwater, in addition, it additionally levels the surface. The thickness of the filler layer is about eight centimeters.
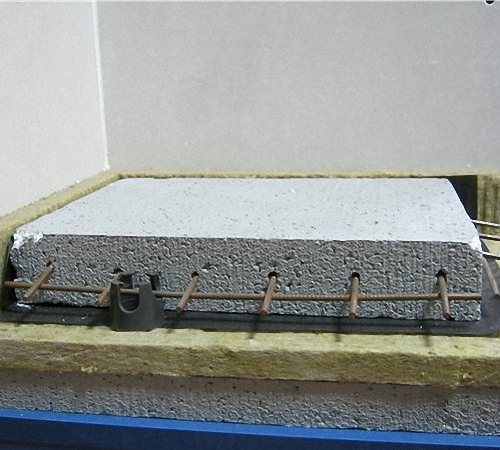
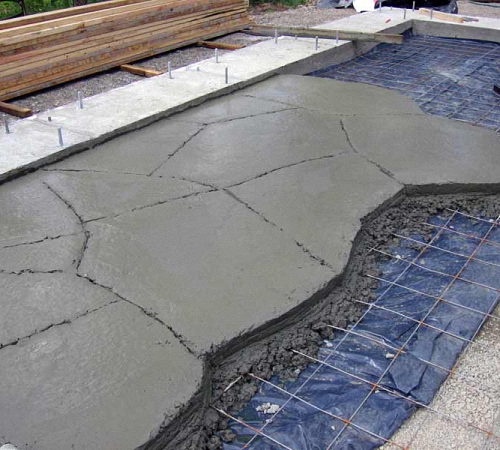
4. The next layer is the use of reinforced steel mesh. It is an excellent fixer for the concrete base. In addition, it is a place for fixing metal pipes. Reinforced mesh is not used in all cases, but only if additional reinforcement is needed.
5. The next layer is more than 5 cm thick and is a subfloor. For its arrangement, a concrete solution is used. After it gains strength within 2-3 weeks, the next layer of the “pie” is installed on the surface.
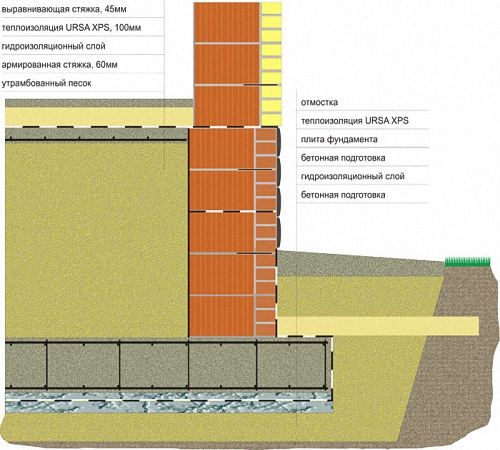
6. This layer consists of a special membrane or waterproofing film, which prevents the risk of absorption of excess liquid by the concrete base. The film is laid with an overlap, in order to avoid the appearance of cracks, construction tape is used, with which all butt sections are glued.
7. The next step is the installation of insulation, which is recommended to use foamed polystyrene foam or high-density polystyrene with a foil coating. If there is too much load on the floor, it is better to use insulation in the form of plates.
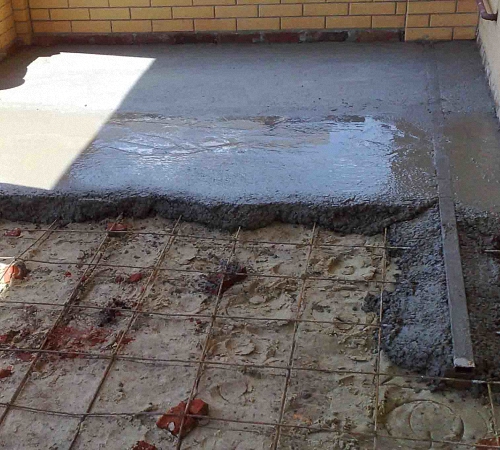
8. Next, waterproofing or roofing material is installed. After which the construction of the final screed is carried out. It is on it that the final finish coating will be installed. The thickness of this layer is from 8 to 11 cm. This screed needs to be reinforced.
Concrete floor in a house on the ground: advantages and disadvantages of arrangement
Among the advantages of manufacturing a concrete floor on the ground, it is worth highlighting:
- ensuring reliable protection of the base from the effects of low temperatures, the soil on which the floor is built always differs only in temperatures above zero;
- a variety of thermal insulation materials for floor insulation allows you to build a structure with good performance in preventing heat loss;
- the floor that will turn out as a result is finished with any of the existing floor coverings;
- no special calculations are required for the floor, since the entire load is taken by the ground cover;
- the arrangement of a warm floor perfectly heats the room, in addition, they heat up quickly enough, and the heat is distributed evenly throughout the room;
- underfloor heating on the ground has good soundproofing characteristics;
- in addition, mold and dampness are practically not formed on such a floor.
Among the disadvantages of a rough concrete floor on the ground are:
- when using a multilayer floor, the height of the rooms is significantly reduced;
- in the event of a malfunction for dismantling, a lot of material resources will be required;
- the arrangement of the floor on the ground requires a large investment of material, physical and time resources;
- if the groundwater is too high or if the soil is highly loose, it is not possible to equip such a floor.
Construction of a concrete floor on the ground: the choice of materials
As mentioned earlier, for the arrangement of a concrete floor on the ground, it will be necessary to build a multi-layer structure. The use of river sand is recommended as the first layer, then crushed stone or expanded clay.
After their installation, a rough screed, waterproofing film and thermal insulation are installed. Next, a finishing screed is installed, which is the basis for laying finishing materials.
The main function of sand and crushed stone is to protect the premises from the penetration of moisture into it. When using crushed stone, it is necessary to carefully compact it, and crushed stone must be treated with bitumen.
If the soil is too wet, the use of expanded clay is unacceptable. Since it absorbs excess moisture, and then changes its shape. After covering the layer with a film based on polyethylene, a rough screed is poured, with a layer of about eight centimeters. Further, a waterproofing of two overlapped polyethylene layers is installed on it. Please note that polyethylene must be very tightly interconnected to prevent moisture from entering the room.
- extruded polystyrene foam;
- mineral wool;
- foam glass;
- polystyrene, etc.
After that, the finishing screed is arranged, which is necessarily reinforced. To ensure the evenness of the screed, the use of beacons is recommended.
Concrete floor on the ground manufacturing technology
The floor should be started only after the walls and roof have already been erected. The procedure for the manufacture of concrete pavement on the ground includes the following steps:
- carrying out work to determine the height of the floor and its marking;
- cleaning the top layer of soil and compacting the base;
- installation of gravel or gravel;
- hydro- and thermal insulation works;
- strengthening the concrete screed;
- installation of formwork for pouring mortar;
- direct filling.
The floor on the ground is built in such a way that it is flush with the doorway. Markings should be applied around the perimeter of the building. To do this, marks are installed on the walls, at a distance of 100 cm from the bottom of the opening. When the markup is done, it should be lowered back one meter. This line will become a guide for pouring concrete. For easier marking, it is necessary to install pegs on which the ropes are pulled along the corner parts of the room.
The next stage of work involves cleaning the base from the top layer of soil. First you need to get rid of any debris that is on the floor. Gradually remove the entire top of the soil. The concrete floor on the ground has the appearance of a structure, up to 35 cm thick. Therefore, the soil that is removed from the surface must be of exactly this thickness.
With the help of special equipment, such as a vibrating plate, the surface is compacted. In its absence, it is enough to use a wooden log, with handles previously nailed to it. The resulting base should be even and dense. While walking, no marks should be left on it.
With a lower location of the soil in relation to the doorway, only its upper part is removed, the surface is well compacted, and then covered with sand.
Further work is carried out on the installation of gravel and gravel. After compaction of the base layer, backfilling with gravel is carried out, the thickness of this layer is about 10 cm. Tip: After backfilling, the surface is watered with water and compacted again. To simplify control over the evenness of the surface, it is necessary to drive pegs into the ground, set in relation to the level.
After the gravel layer is leveled with sand. The layer should have the same thickness, about 10 cm. In order to control the evenness of the surface, use the same pegs. For the arrangement of this layer, it is recommended to use ravine sand, which has various impurities.
On the sand, crushed stone is laid, with a fraction of 4x5 cm. Then it is compacted, and the surface is sprinkled with sand, leveled and compacted. Lay the gravel in such a way as to avoid the appearance of its protruding edges on the surface.
Please note that each of the layers laid on the floor must be previously checked for horizontality. Therefore, in the process of work, use the building level.
Thermal and waterproofing of the concrete floor on the ground
To create a waterproofing layer, it is enough to use a polyethylene film or membrane. The waterproofing material should be rolled out around the entire perimeter of the floor, try to bring its extreme sections a few centimeters beyond the zero designations. The sheets are overlapped and fixed to the surface with adhesive tape.
In order to improve the thermal insulation of the floor and prevent freezing of the soil, it is recommended to treat the floor with mineral wool.
Features of the reinforcement of the concrete floor on the ground
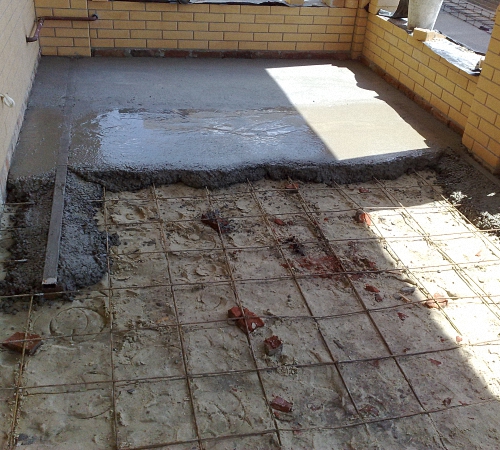
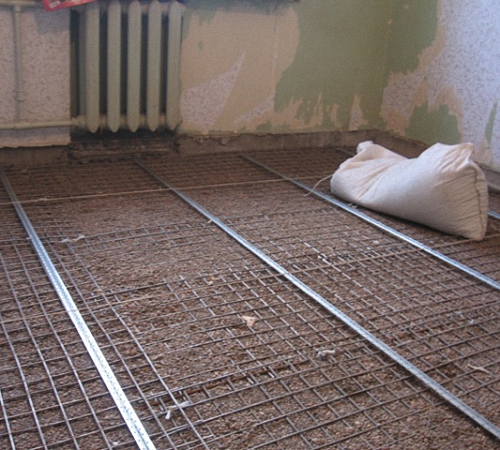
In order for concrete to acquire the desired strength, it must be reinforced. To perform this process, it is recommended to use a metal or plastic mesh, reinforcement bars or reinforcing wire.
To install the reinforcing frame, special stands should be equipped, the height of which is about 2.5 cm. Thus, they will be located directly on the concrete floor.
Please note that the use of a plastic mesh involves stretching it on previously clogged pegs. When using wire, welding and the skill of working with it will be required to make a reinforcing frame.
In order for the pouring procedure to be quick and the result to be of high quality, it is necessary to install the guides and mount the formwork. Divide the room into several equal segments, the width of which is no more than 200 cm. Install guides in the form of wooden bars, the height of which is equal to the distance from the floor to the zero mark.
To fix the guides, use a thick cement, clay or sand mortar. A formwork is installed between the guides, which is the former of cards poured with concrete mortar. As a formwork, it is recommended to use plywood with moisture-resistant characteristics or wooden boards.
Please note that the guides and formwork are brought out to zero and aligned in relation to the horizontal surface. Thus, it will be possible to obtain a base that is distinguished by evenness. Before installing the guides and formwork, they should be treated with a special oil, which will facilitate the process of pulling them out of the concrete mixture.
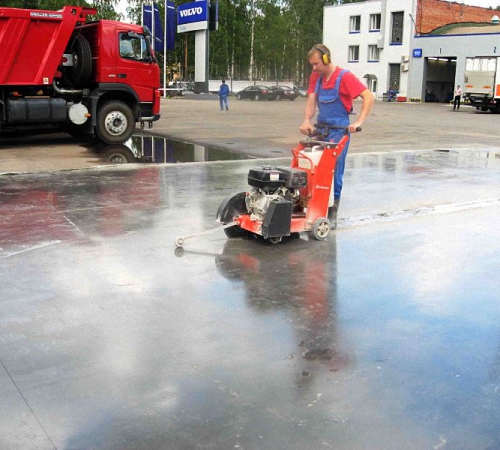
Technology of pouring concrete floor on the ground
Filling is carried out once or maximum twice. Thus, it will turn out to build a homogeneous and powerful structure. In order for the concrete floor on the ground to serve its owners for a long time with their own hands, it is best to order a special concrete mortar from the factory. Its strength and quality is much higher than that of a home-cooked composition.
For self-production of the solution, you will need a concrete mixer, cement of a grade of at least 400, river sand and aggregate in the form of crushed stone.
In order to prepare a concrete mortar, one part of cement, two parts of sand and four parts of filler should be mixed, while, based on the total amount of ingredients, half of the water will be required.
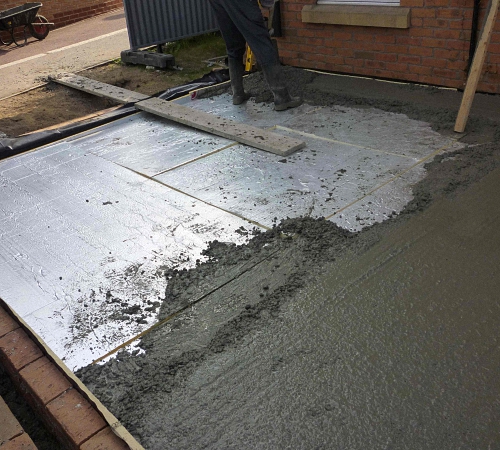
All ingredients are mixed in a concrete mixer, make sure that all ingredients are well mixed with each other. Start pouring the floor from the area opposite to the entrance to the room. Pour three, four cards at a time, and then use a shovel to level the composition over the entire surface.
To ensure good adhesion of concrete to the surface, the use of a manual concrete vibrator is recommended.
After most of the cards are filled, it is necessary to carry out a rough leveling of the surface. For these purposes, you will need a rule, two meters wide, which is stretched across the floor with smooth movements. It is the rule that will help get rid of excess concrete that falls into empty cards. After leveling, the formwork should be removed and the remaining sections filled with mortar.
After leveling the entire floor area, cover the floor with polyethylene film and leave for a month. Please note that after a few days, the surface is constantly wetted with water, in order to avoid drying out of the concrete, the formation of cracks and looseness of the base.
The final stage involves the treatment of the floor with self-leveling mixtures, which equip the screed. It is the mixture that will help to make the base perfectly even and eliminate minor surface irregularities.
Work also begins from the corner opposite the door, it is recommended to use a shovel to apply the mortar, and a rule to level the base.
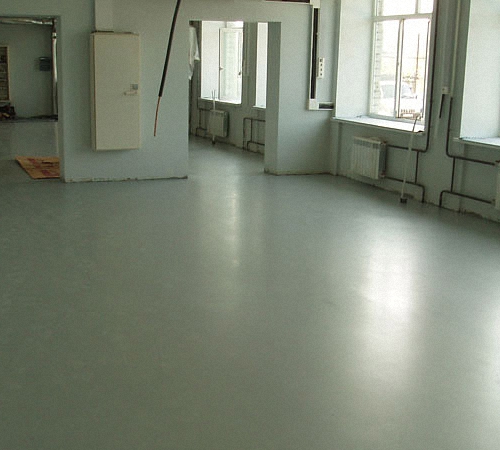
The floor is defended for 72 hours. Next, the floor is ready for laying floor finishing materials. It is this type of concrete floors on the ground in a private house that will allow you to get a solid and durable foundation.
Concrete floors on the ground video: