One of the subfloor options in a private house, garage or office is concrete. For the kitchen or bathroom, this is the only option. Underfloor heating necessarily completes the layer of concrete.
How to fill the floor with your own hands in a private house?
The rough concrete floor is poured directly onto the ground or over the floors. It consists of several layers. Their number and content depend on the nature of the surface on which the floor will be poured and the properties of the room. The main layers of the subfloor in the order of their application:
- underlying;
- waterproofing;
- heat and soundproof;
- reinforcing and heating system (for underfloor heating);
- coupler.
Before pouring the base, it is necessary to calculate the total thickness of all layers. This is necessary in order to know at what depth to remove soil for concrete (lower mark of the subfloor). Next, you need to prepare the soil or floor.
Preparatory work
The procedure and description of the preparatory work when pouring the concrete floor on the ground:
- Markup. First you need to mark the zero mark (the level of the finished floor). It should be at the bottom of the doorway. Exactly 1 m is measured upwards from it and a mark is made. It must be transferred to the walls around the entire perimeter of the room using the building level. Nails are driven in the corners and a cord is pulled. You can draw a solid line at this level with a marker. From this line, measure down 1 m and put zero marks on the walls. For convenience, you can pull another cord at this level.
- Clearing. If the floor is poured onto an old screed, remove it with a perforator. Remove all trash. Seal all cracks with cement mortar. If traces of mold are found under the old floor, it is necessary to treat the surface with an anti-mold compound. To pour the floor onto the ground, remove the soil to a depth equal to the total thickness of all planned layers.
- Ramming. It can be produced using a construction vibrator or a do-it-yourself rammer. To a heavy beam of a meter length, perpendicularly from below, nail a “paw” - a solid board. It is necessary to tamp until there are no traces left when you hit the “paw” on the ground.
It is advisable to carry out all work after the erection of walls and roofing the house. Requirements for the soil for concrete: the depth of groundwater is at least 4 m from the surface, the earth itself must be absolutely dry. It is impossible to pour a concrete floor on weak soil, in particular peat, black soil, etc.
An easy way to determine whether the soil is suitable for pouring the floor is to step on the ground, transferring the entire weight of the body to the heel. In weak soil, the heel will easily completely fail, in suitable soil it will sink no more than half. If it turns out that the soil is not dense enough, you need to remove it until clay or other suitable soil appears, and then fill in the sand to the lower level of the subfloor (about 35 cm below the zero mark).
Underlayment
The draft floor begins with the underlying layer. It can be rigid or non-rigid. If the floor is poured onto the ground, then, as a layer between it and concrete, a non-rigid underlying layer is needed. It is created from several layers of gravel, sand and crushed stone in the following sequence:
- Wet gravel - 8 cm.
- Moistened sand, it is possible with impurities - 6 cm.
- Crushed stone fraction 40 - 8 cm.
- Another layer of sand.
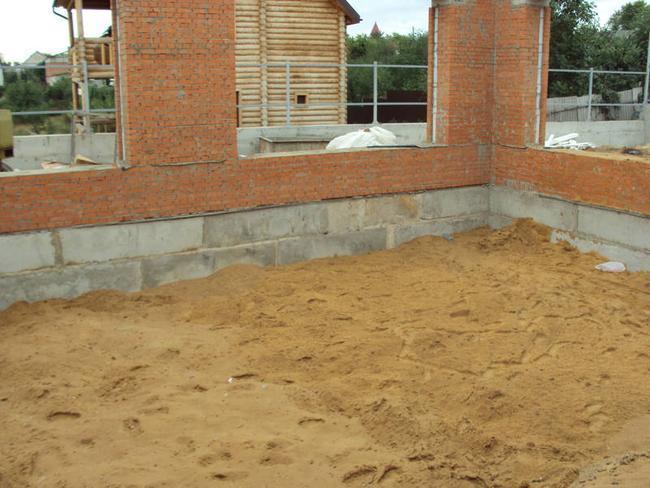
All layers of this "pie" are carefully tamped and leveled. In order for the thickness to be uniform, you need to place pegs with marks on the same level on the surface of the soil. After backfilling the last layer of sand, they can be removed.
In a bathroom, kitchen or other room where the floor will be exposed to moisture and chemically aggressive substances, a rigid one is additionally created on top of a non-rigid underlying layer. When pouring over floors, only a hard layer is made. For it, concrete of a class not lower than B 22.5 is used. Its thickness should be at least 12 - 13 cm. In rooms where sudden temperature changes are possible, it should have expansion joints located in increments of 6 - 8 m, in the form of lines intersecting at right angles. These lines must coincide with the expansion joints of the building, and for floors with a slope for the drainage of liquids, with the lines of the watershed. For transverse seams, metal strips are used. They are laid in concrete during the pouring process and removed after 30 minutes. Longitudinal seams are made using wooden boards coated with bitumen. They are removed after the concrete has cured. All seams are treated with bituminous mastic.
Waterproofing
The next layer is waterproofing. It protects the floor from the penetration of groundwater, sewage and other liquids. Particular attention should be paid to the issue of waterproofing in the bathroom and in the kitchen. Materials that are used for it:
- polyethylene film;
- membrane waterproofing;
- bituminous mastics (coated waterproofing);
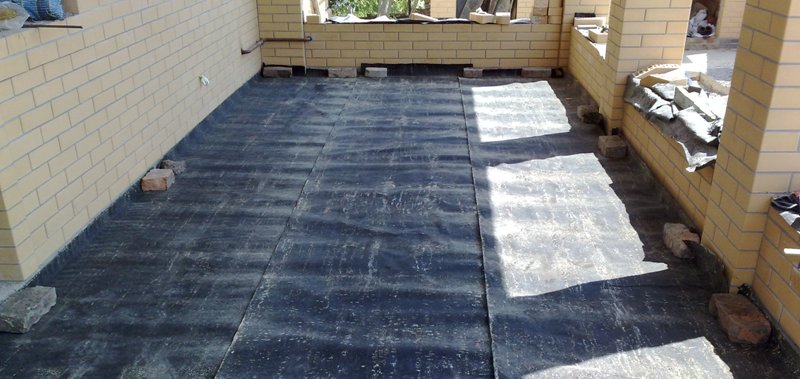
- roofing material or other bitumen-based roll materials (gluing waterproofing);
- asphalt, polymer, bituminous sheet or panel materials.
Any type of waterproofing can be used over a rigid sub-base. For non-rigid, polyethylene film or similar materials are suitable. It is overlapped, with an approach to an adjacent sheet and a bend on the walls of at least 20 cm. The joints are glued with adhesive tape.
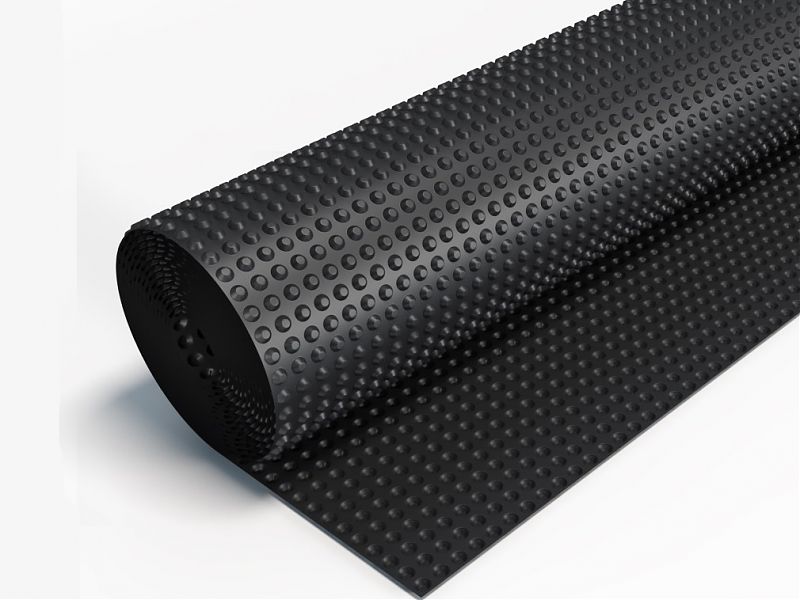
Membrane waterproofing can be made of a polymer or profiled membrane. A polymer membrane with a thickness of at least 0.4 mm is heated with hot air, and it adheres tightly to the concrete. If the width of the canvas is not enough to create a seamless layer, then the joints are connected with special glue, adhesive waterproofing tape or welded. To protect foundations and floors that are constantly exposed to groundwater, a profiled membrane with a thickness of 0.5 to 1.5 mm is used. It has spike-like protrusions up to 20 mm high over the entire surface, hence the name. Such a surface creates conditions for ventilation of the space above the underlying layer, while completely eliminating the ingress of moisture under the membrane. This method of waterproofing allows you to ensure the removal of groundwater in the right direction. The profiled membrane is attached to concrete on bituminous mastic or using dowels with sealed washers.
With the help of bituminous mastics, a coating waterproofing is created. They are applied to the floor surface with a brush or spatula, starting from the wall opposite the door, in several layers. When performing coating insulation, all corners and joints of the walls with the floor must be pasted over with a special tape. It is also carefully covered with mastic.
Important! Layers of coating waterproofing must be applied crosswise, allowing each to dry. The last layer should dry for at least a day. Only after that it will be possible to continue work on the installation of the floor.
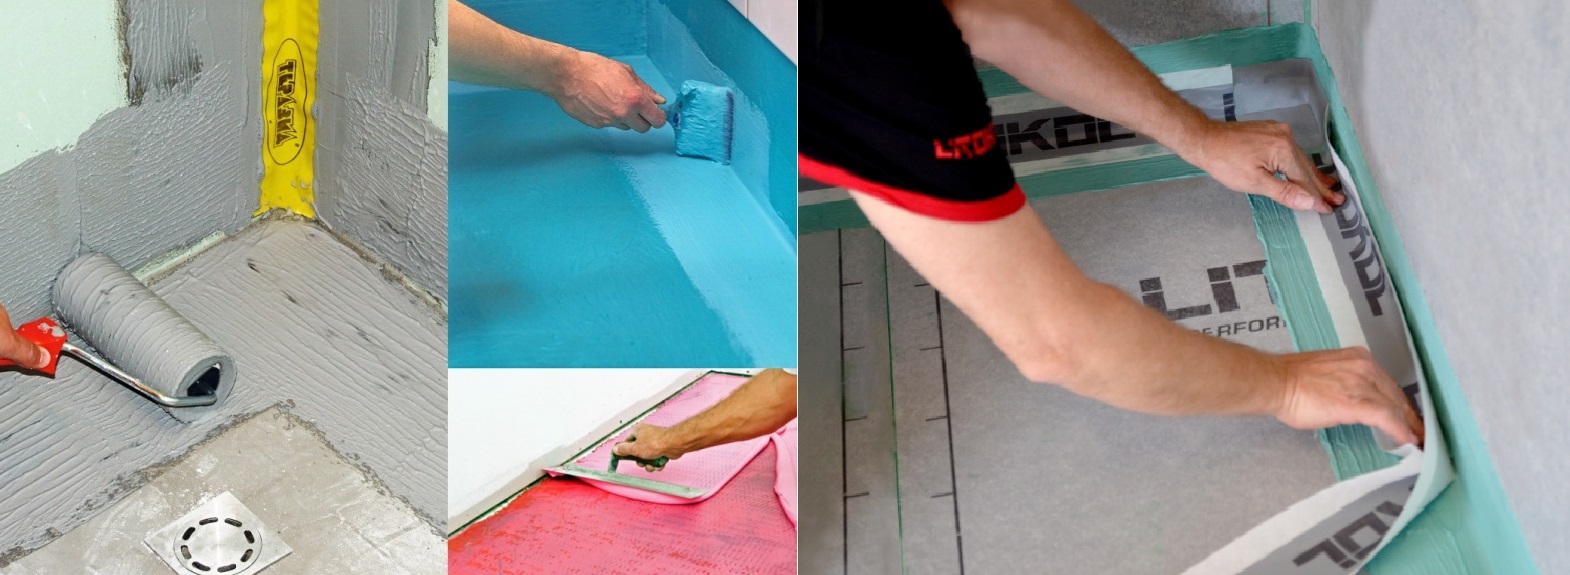
For the floor in the bathroom and kitchen, it is better to use a more reliable adhesive waterproofing. It is performed using roll, sheet and panel materials based on bitumen or polymers. The floor surface is thoroughly cleaned beforehand. Then a roll is unrolled or a sheet of waterproofing material is spread out and allowed to rest for about a day. The canvases are glued with mastic with an overlap of 1 cm on each other. The resulting air bubbles must be cut and re-glued with mastic.
Heat and sound insulation
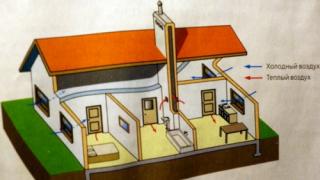
On top of the waterproofing layer of the concrete floor poured onto the ground, a heat-insulating layer is necessarily created. If the floor is poured over ceilings in rooms located above basements, arches, unheated rooms or in rooms located near walls, then a heat-insulating layer is also necessary. To create it are used:
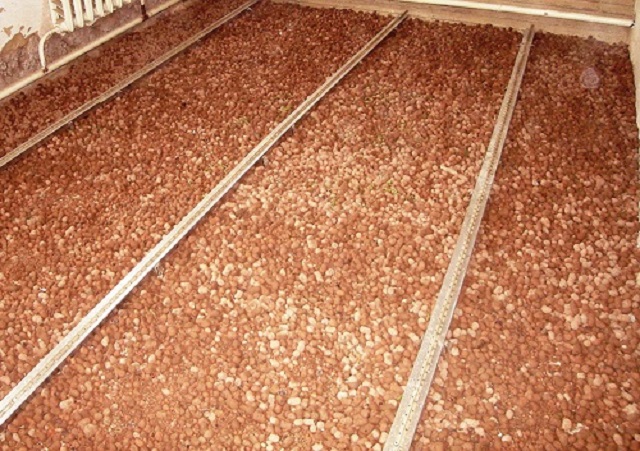
- Expanded clay. This is the easiest way to insulate a concrete floor. 10 - 20 cm of this insulation are poured over a rigid underlying layer, up to 30 cm over a non-rigid one. In order for the layer to be uniform in thickness, beacons are installed. These are segments of a metal profile that are laid horizontally parallel to each other at a distance of no more than 70 cm.
- Mineral wool. High-density material (not less than 120 kg/m3) is laid in 1-2 layers with a total thickness of 10 cm. It must first be treated with a hydrofibrizing agent. In addition to thermal insulation, mineral wool provides sound insulation.
- Styrofoam. It is also used not only for heat, but also for sound insulation. Slabs of this material have special cutouts at the ends, due to which they are overlapped, the layer thickness is up to 15 cm. If the concrete floor is insulated, poured over the ceilings, then the waterproofing layer should be above the expanded polystyrene layer.
- Styrofoam. It is taken with a density of at least 35 kg / cu. m and a thickness of 5 cm, fastened with dowels. The sheets are fastened together with special glue.
- Polyurethane foam. This is a heat-insulating material applied to the surface by spraying. Its advantage is the absence of seams. When using sprayed polyurethane foam for thermal insulation, it is possible not to lay hydro- and sound-proof layers, since it does not allow moisture to pass through and has a high level of sound absorption.
Important! For a floor poured over floors, sound insulation is mandatory, so it is better to opt for heaters that have additional noise-absorbing properties.
Preparation for pouring concrete
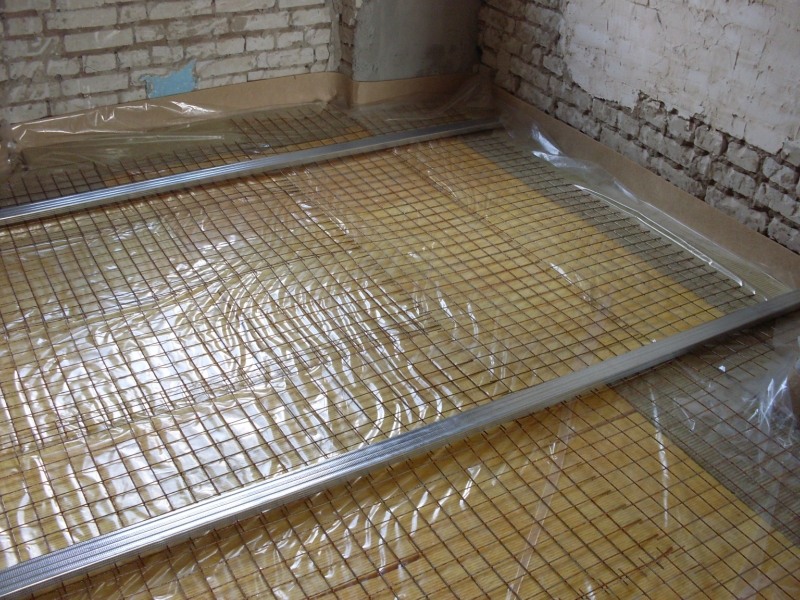
For the greatest strength of the future floor, it is necessary to make reinforcement. It is performed using a metal mesh 4–6 mm thick with a mesh size of 10 x 10 cm. The reinforcement is fixed with clamps at a height of 2–3 cm from the base. Fragments of the mesh are fastened together with wire. If the project provides for the installation of a warm floor, then pipes of the heating system are attached to the fittings.
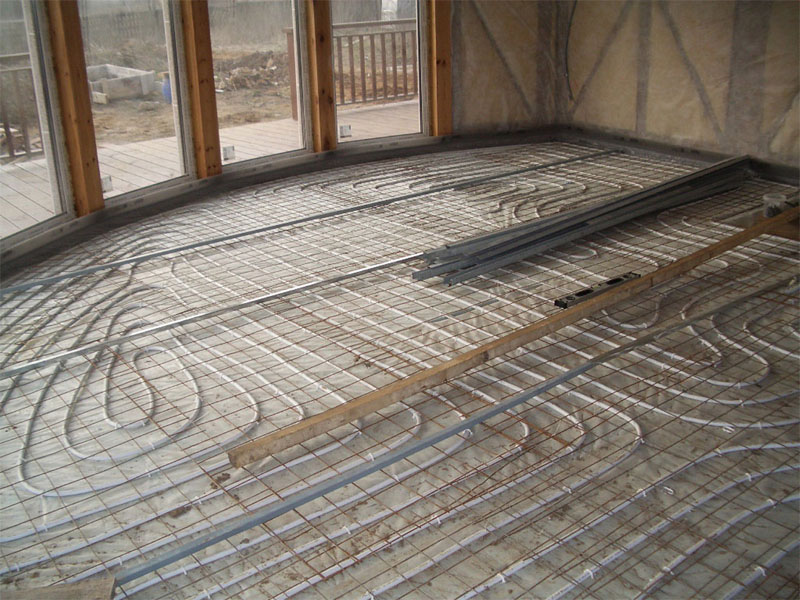
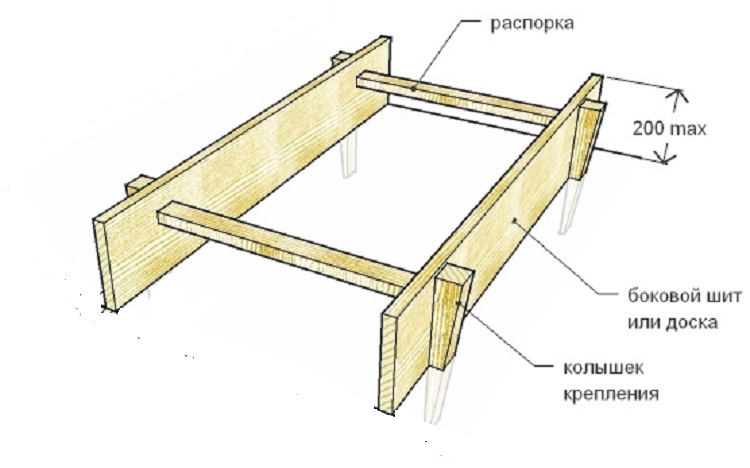
To make the process of pouring the floor with concrete more convenient, you need to make formwork from boards or plywood and set the guides. The floor surface is divided into rectangles with a width of 1.5 to 2 m. Metal pipes or wooden bars can be used as guides (beacons). They are installed at the level of the zero mark of the subfloor. If it is possible to pour concrete in one step, you can not use the formwork.
Screed
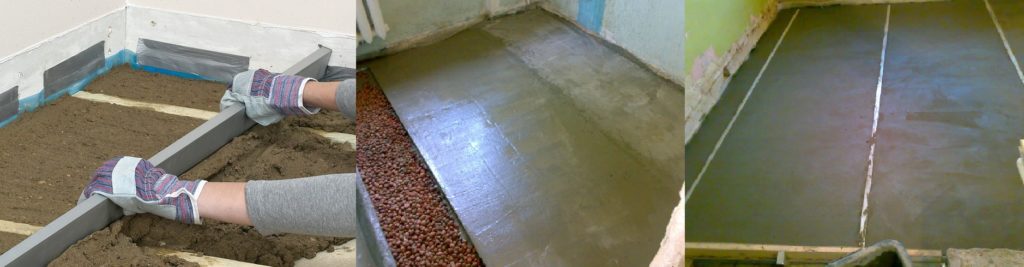
The last stage of floor installation in a private house is the pouring of a concrete screed. For it, concrete of a class not lower than B 12.5 is used. Start pouring from the corner opposite the door. The layer thickness should be 6 - 8 cm. The concrete is poured with a shovel, and then leveled with a rule moving along the guide beacons. Deviation from the surface of the screed from the horizontal plane should be no more than 2 mm per 2 m of floor length. When air bubbles appear in the concrete layer, they are pierced with a shovel. After the pouring is completed, the formwork and beacons are removed. The recesses remaining after them are filled with concrete. When pouring a concrete screed, it is necessary to make expansion joints the same as on a rigid underlying layer (a grid of straight lines with a step of 6 - 8 m). The finished screed is covered with polyethylene and left for several days.
With the help of a self-leveling mixture applied over concrete, all irregularities and defects in the subfloor can be smoothed out. Procedure:
- The mixture is diluted with water in the proportion indicated on the package and stirred thoroughly. To do this, you can use a drill with a special nozzle.
- Pour the resulting solution onto the floor and level with a brush.
- The resulting air bubbles can be removed with a spiked roller.
Features of pouring a concrete floor in the bathroom
The floor in the bathroom should be slightly below the level of the floors in the entire house, to prevent water from flowing into the rooms in the event of a spill. It is desirable to make the floor with a slight slope. This will make it easier to clean up spilled water. When pouring the floor with concrete in a private house with your own hands in the bathroom, it is recommended to make a ladder to drain water from the floor into the sewer pipe. In this case, you need a slope towards the ladder. Heated floors are especially suitable for the bathroom.
Subject to careful selection of materials and careful sequential execution of all stages of work, pouring a concrete floor in a private house with your own hands can be done even by not the most experienced craftsmen.