The screed serves to level the surface and distribute the loads on the lower heat and sound insulating layers of the floor. The screed is the basis for the top floor finish. The screed must also ensure the thermal comfort of the floor - the amount of heat absorption of the floor in accordance with the standards.
The floor screed is usually made of monolithic concrete. But recently, in private housing construction, a prefabricated dry screed made of building boards or sheets is becoming increasingly used.
A prefabricated dry screed consists of two layers of slabs stacked on top of each other. The slabs are laid with offset joints both in the layer and between the layers, Fig.1.
Plates of the lower and upper layers are fastened together over the entire surface with glue and self-tapping screws, Fig.2.
It turns out a continuous, over the entire area of \u200b\u200bthe room, an even and fairly durable coating.
Pros and cons of dry prefabricated floor screed
The use of a dry prefabricated screed when laying floors has the following benefits:
- Prefabricated screeds reduce the time of work, as they do not require time for hardening and drying.
- They do not add moisture to the premises and the underlying layers of the floor, which speeds up the finishing and settlement.
- They have a low specific gravity. Weakly load floors. Suitable for floors on floors with wooden beams.
- They provide, in comparison with monolithic screeds, better thermal comfort of the floor and thermal insulation properties, as well as a higher degree of sound insulation from impact and airborne noise.
- They create a solid and durable base suitable for laying any floor covering without additional work.
To disadvantages prefabricated screeds, compared with a monolith, should include:
- Greater sensitivity to flooding. It is not recommended to make floors in rooms where there is a risk of large amounts of water falling on the floor.
- Withstand smaller loads. Prefabricated screeds are used for moderate and low intensity mechanical impacts on the floor, in dry and moderately humid rooms.
- A warm water floor with a dry screed will have a lower heat output per 1 m 2 than with a monolithic concrete screed.
How to make a dry floor screed
Work on the screed device is carried out in a room with a temperature not lower than + 10 ° C and air humidity not more than 60%.
Work on the installation of a prefabricated dry floor screed is performed in the following sequence:
- A moisture vapor barrier is laid on the concrete base of the floor - a polyethylene film with a thickness of at least 0.15 mm. with an overlap of strips at the joints 200-300 mm.
- A layer of sand is poured and leveled, rammed and leveled again.
- The first layer of sheets is laid with a gap in the joints of not more than 1 mm. and with offset joints in rows of at least 250 mm.
- Apply glue in a continuous layer sequentially under each sheet of the second layer.
- Lay a sheet of the second layer on the glue. The offset of the joints of the sheets of the lower and upper layers, as well as in the rows of the layer, must be at least 250 mm.
- Sheets of the upper layer are attached to the sheets of the lower layer with self-tapping screws, Fig.3.
- The joints between the sheets and the installation sites of the screws are leveled with putty, a primer is applied - if necessary.
When laying prefabricated screed sheets, in order to ensure the displacement of the end joints of the sheets in adjacent rows and eliminate waste, each new row begins with laying the part of the last element of the previous row cut off in place, Fig1.
A gap of 10-20 should be left between the screed plates and the walls mm filled with edging tape.
For the installation of a prefabricated dry screed for the floor, you can use the following plate materials:
- gypsum-fiber moisture-resistant sheets (GVLV);
- cement-bonded particle boards (DSP);
- moisture-resistant gypsum boards (GSPV)
- chipboard (chipboard);
- oriented strand boards (OSB, OSB);
- plywood.
Consider the features of the use of sheets of different materials for the screed device.
Gypsum fiber screed - GVL
For gluing gypsum-fiber sheets, PVA glue or adhesive mastic is applied in a continuous layer.
During the installation process, the sheets are fastened with self-tapping screws with a length of at least 19 mm, Self-tapping screw for GVL special - has a two-start thread and a device for self-sinking, which makes it possible to penetrate into the sheet with one pass. Ordinary self-tapping screws very often spontaneously unscrew under the influence of operational loads.
Screed made of chipboard and oriented strand boards and plywood
Between the leveling layer of sand and the wood coating of the screed, it is necessary to lay an additional layer of moisture vapor barrier made of paraffin paper or glassine.
It is convenient to use prefabricated screeds made of waterproof plywood under coatings, in the manufacture of which small nails are used - floor coverings from solid boards or mosaic parquet from wood of various species (parquet carpet). Plywood screed provides better heat absorption of floors, more resistant to mechanical stress.
When using chipboard, OSB, plywood boards in residential premises, it should be remembered that these materials are a source of harmful gas - formaldehyde.
A prefabricated dry screed can be turned into a water heated floor. How to do it
On the construction market, they offer ready-made structural elements of a factory-made prefabricated screed - special slabs with folds, dry fillings of various compositions.
Watch the video, which shows the installation of a prefabricated screed from prefabricated prefabricated elements.
Dry screed floor structures
Floor on the ground is an economical solution for a private house.
The concrete floor on the ground lies directly on the wet and cold ground. The design of the floor should serve as a barrier that protects the premises in the house from the cold and moisture of the soil.
For residential premises on the first floor of the house not an expensive option there will be a floor installation on the ground with a dry combined floor screed, Fig.4.
The floor with a prefabricated screed is afraid of flooding. Therefore, it should not be done in the basement, as well as in wet rooms - a bathroom, a boiler room.
The floor on the ground with a prefabricated screed consists of the following elements (positions in Fig. 4):
1 - Flooring - parquet, laminate or linoleum.
2 - Glue for joints of parquet and laminate.
3 - Standard underlay for flooring.
4 - Prefabricated screed from prefabricated elements or gypsum-fiber sheets, plywood, chipboard, OSB.
5 - Glue for assembling the screed.
6 - Quartz or expanded clay sand.
7 - Communications pipe (water supply, heating, electrical wiring, etc.).
8 - Insulation of the pipe with porous-fibrous mats.
9 - Protective metal casing.
10 - Expansion dowel.
11 - Waterproofing - polyethylene film.
12 - Concrete base made of concrete class B22.5.
13 - Foundation soil.
The design of the adjoining floor to the outer wall is shown in Fig. 5.
The positions in Figure 5 are as follows:
1-2. Lacquered parquet, parquet, or laminate or linoleum.
3-4. Adhesive and primer for parquet, or standard underlay.
5. Prefabricated dry screed from prefabricated prefabricated elements with a tongue-and-groove joint.
6. Water-dispersion adhesive for screed assembly.
7. Moisture insulation - polyethylene film.
8. Quartz sand.
9. Concrete base - concrete screed class B22.5.
10. Separating gasket made of waterproofing roll material.
11. Thermal insulation made of PSB 35 foam plastic or extruded polystyrene foam, according to the calculation thickness.
12. Foundation soil.
13. Plinth.
14. Self-tapping screw.
15. Outer wall.
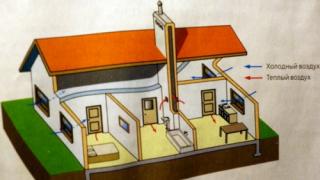
The layout of the floor on the ground, waterproofing of the basement and walls, in a building with living quarters, is shown in Fig.6.
Here, in Fig. 6, the positions are as follows:
- Aerated concrete blocks.
- Waterproofing.
- The foundation is combined with the basement.
- Grid plaster.
- Net.
- Blind area.
- Glue, solution.
- Interior decoration.
- Ground floor.
Let's take a closer look at some elements of the floor structure
Why is a prefabricated screed made of sheets, and not a monolithic one?
For the floor there are thermotechnical standards for heat absorption of the floor.
Heat absorption of the floor- the property of the surface of the floor covering to a greater or lesser extent to perceive heat with periodic fluctuations in the heat flow or air temperature.
The heat absorption index for residential premises is 12 W / m2 * hail. - no more. Depends on the thermal inertia of the materials in the floor layer.Simply put, standing barefoot with one foot on a wooden floor and the other on a concrete floor, you will feel the difference in the heat absorption of the floors.
In order to ensure the norm of heat absorption of the floor without additional layers of insulation, this design uses a screed of relatively "warm" plates in combination with sand backfill.
The screed has other advantages as well.The prefabricated screed is laid on a layer of dry quartz sand (washed construction sand). This layer also affects the heat absorption of the floor. The thickness of the sand layer in the proposed floor structure must be at least 40 mm. and not more than 100mm.
In this layer of sand, you can place piping with various communications. Then the height of the sand layer should be 15 mm higher than the pipes. (Fig.4). Instead of quartz sand, perlite or expanded clay sand of a fraction of 1.5-5 mm can be used, with a layer up to 100 mm thick.
A sufficiently thick layer of light sand will improve the heat absorption and sound insulation of the floor.
Under the combined screed, you can place a layer of insulation. The design of such a floor is shown in the figure:
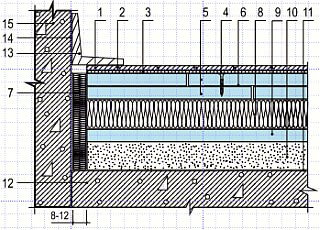 Fig.7. A layer of insulation is placed under the combined screed. 1 and 2 - finishing floor; 3 - substrate; 4 - self-tapping screw; 5 - sheets of prefabricated screed; 6 - glue; 7 - edge tape; 8 - thermal insulation plates; 9 - interlayer; 10 - dry backfill leveling; 11 - moisture insulation; 12 - overlap with an uneven surface; 13 - plinth; 14 - glue; 15 - wall.
 The presence of insulation plates under the combined screed will provide the best indicators of heat absorption floor and make the floor energy-saving. Heat leakage into the underlying layers of the floor will be significantly reduced.
Extruded polystyrene foam boards (EPS) or rigid mineral wool boards with a density of at least 125 kg / m 3 are used as thermal insulation.
Interlayer (pos. 9) serves for uniform distribution of concentrated point loads in the soft layers of the floor. As a layer, moisture-resistant gypsum-fiber - GVLV, or glass-magnesite - LSU, sheets with a thickness of at least 10 mm are used, laid on the backfill layer with a gap in the joints of not more than 1 mm. The joints of the sheets are glued with construction tape. The joints of the interlayer sheets (pos. 9) should not coincide with the joints of the thermal insulation boards (pos. 8).
If for thermal insulation use XPS boards with tongue-and-groove joints, then layering can be omitted.
Dry filling for the floor
Backfill (for example, pos.10 in Fig.7) evens out uneven surfaces. The thickness of the backfill sand is not less than 30 mm. and no more than 100 mm. over the entire surface of the floor. The backfill is slightly compacted, especially along the walls.
If the total backfill thickness is more than 100 mm, then the backfill is arranged in two layers. The lower and upper layers of the backfill are separated by interlayer sheets (pos. 9. in Fig. 7). The thickness of each layer of backfill is not more than 100 mm.
For backfilling, ordinary construction washed quartz sand is used. It is better to use perlite or expanded clay sand (fraction 1.5-5 mm.). The use of light sand improves the sound insulation and heat absorption of the floor.
The thickness of the backfill layer to ensure the norm of heat absorption of the floor is at least 40 mm. Make layer thicker than 100 mm. Not recommended.
Particular attention is paid to the humidity of the backfill - it should be no more than 1%. The backfill should not be allowed to get wet during the work. Backfill layer with a thickness of over 50 mm. it is necessary to lightly tamp - always along the walls.
On sale in the construction market you can find ready-made dry filling for the floor based on expanded clay sand and tongue-and-groove slabs for dry screed. If ready-made prefabricated screed boards are used, then the boards are laid in one layer, fig. 5.
Floor waterproofing on the ground
Moisture insulation can be placed both on the concrete layer, in Fig.4., and on the sand layer, Fig.5. A layer of moisture insulation is put on the wall. As moisture insulation, a polyethylene film with a thickness of at least 0.15 mm is used. or other rolled waterproofing material.
Butt joints of moisture-proof materials are overlapped with an overlap width of 200-300 mm. The joints between the concrete floor slab on the ground and the walls, as well as all gaps in the slabs on the ground in places where pipes and other structural elements are passed, must be sealed using non-hardening sealants.
Careful sealing is necessary not only to prevent moisture, but also to
It should also not be forgotten that floor structures should not have a rigid connection with the walls. The gasket, item 10 in Fig. 5, serves this purpose.
The thickness of the concrete base slab is 6-8 cm. The screed must be reinforced in places where partitions made of masonry materials will be installed on the concrete. How to do this - read the above article.
Gap 10 mm. between the wall and the screed, in fig. 5, compensates for changes in the linear dimensions of the screed, parquet or laminate with fluctuations in humidity.
Ground floor insulation
Thermal insulation, pos.11 in Fig.5., eliminates the bridge of cold from the street through the plinth, floor backfill soil, concrete base slab, screed - see Fig.6.
According to the code of building rules SP 29.13330.2011, under a concrete base along the outer walls, as well as walls separating heated rooms from unheated rooms, a layer 0.8 m wide should be laid on the ground from a moisture-resistant insulation with a thickness determined from the condition for ensuring the thermal resistance of this insulation layer not less than the thermal resistance of the outer wall.
Similarly, the calculation of thermal insulation for the floor on the ground is performed. It is only necessary to replace the layers of the wall with the layers of the floor - basement, soil, insulation, concrete slab, screed.
Thermal insulation to eliminate the cold bridge can be placed not only horizontally - under the floor along the perimeter of the outer walls, as shown in Fig. 5. Instead of a horizontal insulation belt, you can make a vertical one by placing a layer of thermal insulation on the inner or outer wall of the foundation - the basement.
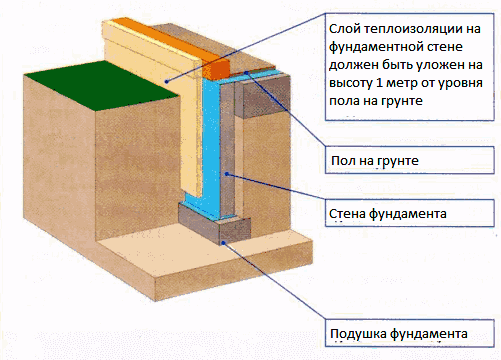 Vertical insulation of the foundation and basement of the house with floors on the ground. The vertical waterproofing of the foundation, the horizontal waterproofing of the basement and the floor must be hermetically joined - shown in blue.
 It is better to insulate the basement from the outside. With horizontal or internal basement insulation cold bridges remain through the basement to the internal walls of the house.
The vertical thermal insulation of the basement is buried in the ground so that the total height of the insulation layer from the floor level is at least 1 meter.
It is not required to arrange a continuous layer of thermal insulation over the entire floor area in this design. The soil at the base of the floor provides the thermal insulation of the floor necessary for the normative conditions of energy saving.
It is more convenient to carry out work on backfilling and compacting the soil at the base of the floor, as well as pouring a concrete base immediately after the foundation is laid, before the walls are erected.
The floor on the ground is a multi-layer construction, and each subsequent layer hides the workmanship of the lower layer. Be sure to inspect, control and accept from the contractor the compliance with the project and the quality of work for each layer. It is more correct to entrust the acceptance to your trusted specialist - the technical supervision engineer.