The roofs of residential buildings are very different, but the most popular are structures with sloping slopes. They allow you to equip a spacious attic, provide a natural and quick drain of rainwater and snow, give the building a cozy and complete look. In addition, in sloping roofs, you can organize an additional window for ventilation, lighting, and just for beauty. For information on how to make a skylight, read this article.
Windows built into the roof are dormer and dormer, but the essence of this, by and large, does not change. Initially, such windows were designed to ventilate the attic, but later they began to be used for additional lighting and visual expansion of the space. So, when overpopulation was observed in Europe, people were looking for an opportunity to use every square meter of living space with benefit, so they made additional rooms out of attics. And in order to spend less on lighting, they expanded and modified small dormer windows, turning them into an additional source of natural light.
By the way, do you know why dormers are called that? The video below will answer this question:
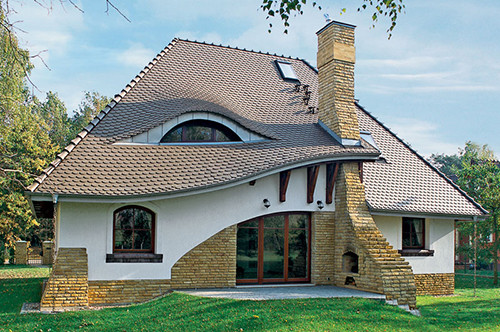
Interesting: In the Middle Ages, it was fashionable to magnificently decorate skylights in accordance with the style of the facade of the building. They were called lucarnes. After the Second World War, modest dormer windows were transformed and expanded - this is how skylights appeared, which are still very popular today.
So, why do many today put dormer windows on the roof:
- They give additional lighting to the attic space.
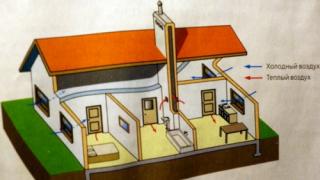
- They provide regular and high-quality ventilation of the under-roof space, which prolongs the life of the cake materials.
- In some cases, the attic window provides an additional exit to the roof for its preventive maintenance.
- A beautifully designed dormer or dormer window gives an original appearance to the architectural composition.
- Can serve as an additional emergency exit.
Window types
Before you install a window in the roof, you should understand the varieties of such structures. Dormer windows look like small "houses" with two slopes. Attic, on the other hand, are placed flush with the slope of the main roof and are not protected by a canopy, so they let in more sunlight. In other words, dormers are placed vertically, and dormers are horizontal (they repeat the geometry of the roof slope). Accordingly, for vertical windows it is necessary to build an additional frame, which will be described later.
In most cases, dormers look like triangles. Their main feature is that the pediment side does not sink inward, but stands in the same plane with the facade. In acute-angled roofs, windows with large frames can be placed on the pediment, using original details similar to cathedral vaults. If you are going to install a window with a shed roof, then separate gutters should be placed on it. The minimum allowable slope of such a roof is 5-15 °.
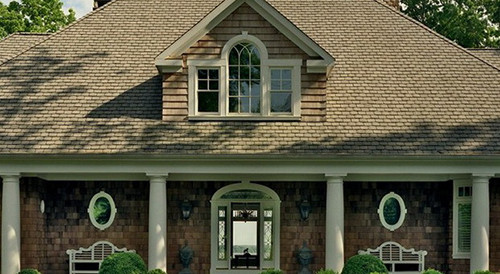
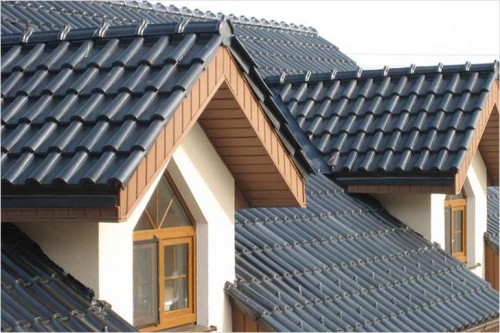
Despite the fact that today many people choose dormer windows, the majority still prefer dormers. Since they are located in the same plane as the roof, they are able to let in more light, take up less space, and make them much easier.
And yet, what type of window to choose? If you live in an old house with characteristic architectural features of its era, then it is best to build a skylight. For more modern designs, roof windows are suitable. For the installation of the former, special niches in the roof are needed, since the frame of the truss system and the sidewalls of the window needs a large number of attachment points with the main roof.
The roof window is enough to be fixed between the roof rafters. They will act as a barrier to water flows, and therefore it is better to place them on sloping roofs with an angle of inclination of 15-20 °. Dormer-type windows are rather complex structures with well-thought-out protection from cold, wind and moisture. It is not possible to make such a window on your own, therefore it is most reasonable to purchase it from the appropriate company.
Dormer window installation
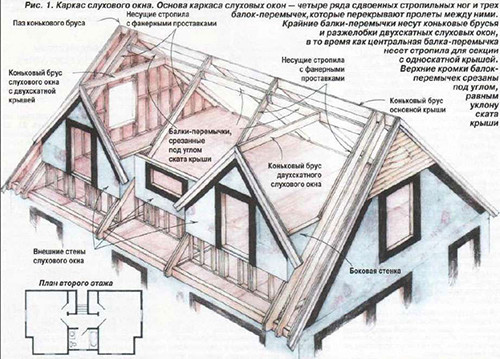
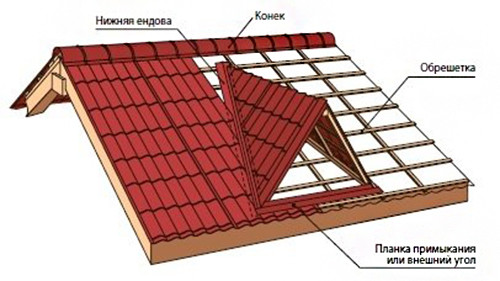
Since the construction of a roof dormer is very complex, before you start building it or go to the store for materials, you need to make a detailed drawing. The image below shows one of the possible arrangements on a gable roof.
Helpful Hint: To calculate the dimensions and number of dormer windows required for proper lighting and ventilation of the attic, use a simple rule: their total width should be more than ½ the width of the under-roof space.
It is not necessary to place the windows in one row, they will look beautiful at different levels. The lower edge should be located 90 cm from the attic floor, and the height of the window can be 1.5-2 m or higher, as far as the ceiling of the room allows. It is logical that the higher the window, the more light it will let in.
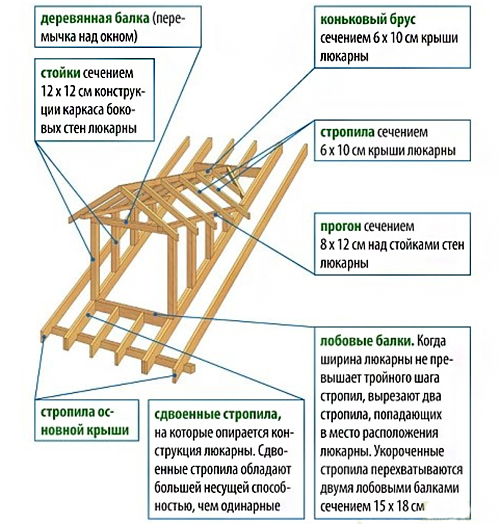
Frame manufacturing
The arrangement of the dormer window must begin with the development and arrangement of the frame system. It is best to do this at the same time as installing the common roof truss system. In a similar design, its own ridge beam, rafters and crate are provided, on which layers of the roofing cake will then be laid. Simply put, in order to get a dormer window, it is necessary to build another similar roof in miniature on the roof.
The specifics of the installation work:
- Protect the window openings with rafter legs. For their manufacture, it is recommended to choose high-strength materials that can withstand the load from all structural elements of the window, including double-glazed windows, lathing and roofing.
- Lay the cross beams - the lower one should be flush with the outer wall, and the place where the upper one is attached depends on how high you want to make the window.
- Install the uprights by resting them on the lower beam, then tie them at the top with a crossbar.
- Fasten the resulting frame with the longitudinal bars to the upper beam, which rests on the rafters.
- As a result, you will get a frame, which subsequently needs to be supplemented with a truss system. It is built on the same principle as for the main roof of the house.
An important point: When you fix the jumper beams, you should not make cuts in the rafter legs into the bases, as this will make them less durable. Attach all structural elements with various metal fasteners.
When you have arranged the frame, check its location in space by adjusting the vertical and horizontal using the building level and plumb line. Skews should not be allowed under any conditions, even minimal ones. Only after that you can begin to lay the ridge and rafters of the roof of the window. They should be cut out of wood according to a pre-prepared template.
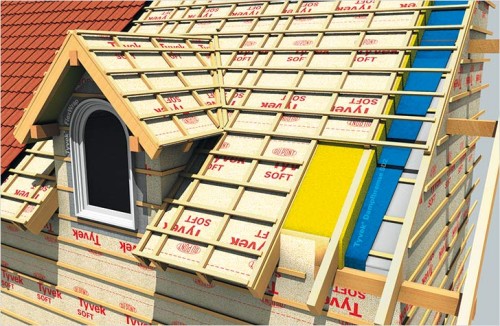
The sidewalls of the window are recommended to be finished with hydrophobic materials. It is best to install the main roof and dormer roofing at the same time, paying close attention to potential leaks. These can be various joints, corners, outlets for pipes and vents. Make reinforced waterproofing there with membranes, clamping strips and silicone weather-resistant sealants.
Installation of valleys
The technology for building and installing a dormer window seems very similar to the arrangement of a conventional multi-gable roof, but there are several significant differences. So, usually the slopes of a multi-gable design are located at the same angle. The slope of the window canopy is 64 °, and if it is installed on a roof with a slope of 40 °, then this will require the construction of non-standard grooves or valleys. At the same time, the top and bottom are built using different technologies. For the construction of the top, slanting rafters are used and the sprigs are supported on them at an angle of 64 °.
How do these windows on the roof of the house:
- Transfer to the floor the central point of intersection of the valley beam with the ridge.
- Draw a line along the ruler from this mark to the corner of the side wall and to the ridge beam. These two lines will be the projection of the ridge beam and the valley in the horizontal.
- Find the angle between these two lines and file the lower end of the valley beam at this angle so that it can clearly adhere to the side wall.
- Stretch a string or line between the ridge and the corner of the sidewall and find the angle of the cut of the top of the beam. Measure the distance between these points - this will be the length of the valley beam.
- Transfer the projection line to the side beam and measure the length of the lower end cut.
When you are done with the measurements, mark the workpiece at the point of installation of the beam, cut it to length and make cuts at the edges at an angle of 18° and 72° and put them in place.
Helpful Hint: For each such window, you need to make a pair of similar mirrored rafters. For sparrows, it is best to make a template in advance so that you do not have to measure it every time.
In the lower part of the window, where the inner surface of the soft roof is hidden by the side walls and invisible from the side of the attic, experts resort to a simplified method of mounting the groove. A valley beam is nailed to the roof sheathing and the ends of the window roof rafters rest on it. Accordingly, this work is performed after laying the main roof sheathing with plywood or other sheet material. To increase the strength of such sheathing, it is best to lay sheets from the side walls of windows.
How to find out the dimensions and location of the support beam:
- Between the end of the rafter and the outer end of the gable, stretch a special chalk cord.
- Tap off the chalk line with a string.
- Measure the length of this line and cut out the blank.
- Cut off its outer side end at a 64° angle.
- Nail the beam along the chalk markings.
It is easiest to make blanks for the lower rafters according to a template, and before installation, just file the ends to the required dimensions. After installing all the details, it remains only to sheathe the roof of the window with moisture-resistant plywood and roofing material. Plywood should be laid on top of the ridge beam, especially if you are working with steep slopes. Stand at the very top and place a solid plywood sheet, placing it clearly along the top end of the ridge. After fixing it, you can go down, measure and fit the rest of the corner pieces.
Installation of skylights
Installing windows in the attic roof will be much easier, because they do not need to build personal "houses". But precisely for this reason, increased requirements are imposed on such structures. So, it is necessary to observe the utmost accuracy in measurements, make a very rigid frame and make sure that the entire window has improved thermophysical characteristics.
![]()
The design of the roof window resembles a layer cake of all kinds of insulating parts, latches and lotions. We have already said earlier that it will not work to do this with your own hands, so it is better to familiarize yourself with the offers on the market and choose the most suitable one.
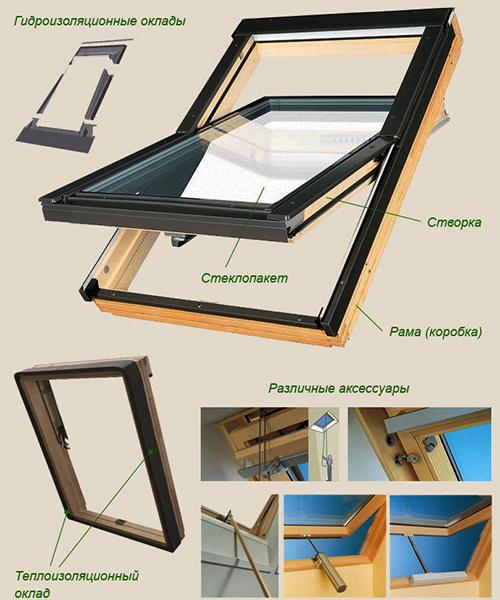
To properly install a window, you need to know what it consists of:
- Marquisette - protection against external mechanical influences.
- Salary - can be made of various materials and is selected depending on the roofing, which allows you to position the window as flush as possible with the roof slope. Salaries are smooth, for roofs made of bituminous tiles with a wave of no more than 8 mm, 16 mm, 30 mm, etc.
- A roof window is actually a double-glazed window.
- Protective circuit for thermal and waterproofing.
- Blinds or curtains - often not included and are purchased separately in accordance with the interior design of the attic.
- Internal slopes.
When you have decided how many windows you need to install in the roof, and what their sizes will be, you should make a markup. To do this, mark their location from the inside, putting marks with a margin of 2-3 cm on the right and left and 10-15 cm on top and bottom.

How to install a skylight:
- Cut a piece of waterproofing material to fit the size of the window, leaving a margin of about 20 cm on each side.
- Remove the sector of the main roof where the window will be located, or cut it out.
- If necessary, remove parts of the truss system that interfere with work.
- Nail in the lower part at a distance of 8-10 cm from the crate a support beam with a section of 50 mm.
- Nail the bottom of the waterproofing sheet to the timber.
- Attach the top end of the waterproofing to the top crate.
- Pull the side edges of the waterproofing out.
- Frame fasteners are carried out in accordance with the design features. Since windows from different manufacturers are slightly different, it will be useful to read the instructions included in the kit or consult directly with a company representative.
- After installing the frame, attach the brackets to it. Fix the lower ones firmly, and do not tighten the upper ones immediately, as they will still be useful for adjusting the position of the sash.
- Attach insulation to the top of the frame.
- At the bottom, lay the thermal insulation on the support beam.
- Install the sash and adjust the tightness of its fit using the top brackets. After that, they can be finally tightened.
- Attach the side ends of the waterproofing sheet to the frame, and then lay the insulation there.
- In the upper part, install a drain chute in accordance with the design features of this window model (you may need to consult the manufacturer again).
- Place an apron around the window to protect it from leaks, and attach it to the frame, top batten, support bar, and rafters. Insert the edges of the apron under the crate, and put the upper part under the gutter.
Useful advice: Do not use mounting foam for additional waterproofing of joints, since its pressure can disrupt the correct location of the window. Use weatherproof sealants for this.
As you can see, installing windows in the roof of a house is quite complicated and comes with some risks. If you still decide that you can do this work yourself, take care of your personal safety and purchase high-quality equipment for working at height.