Before the start of construction of a house, the owner faces a number of problems related to arranging a comfortable stay in it. Normally functioning air exchange throughout the house, and in the kitchen in particular, is one of the most important tasks that must be solved even at the stage of designing a new home. We will talk about how to mount ventilation (hood) in the kitchen in a private house with your own hands in this article. Scheme, photo and video, as an addition to the text for clarity.
Requirements for the hood in the kitchen in a private house
The kitchen is a room of excessively increased humidity and air pollution with aromas from cooking, carbon monoxide particles, so a well-thought-out and well-organized process of supplying oxygen in it is simply necessary. Ventilation in the kitchen of a private house must meet certain requirements:
- ventilation should be formed so that the formed dangerous emissions are quickly diluted with clean air, after which they are completely removed outside the house;
Important! The kitchen room is certainly equipped with a window with a window and two exhaust channels. In this case, the minimum height of the walls of the kitchen room is at least 2.2 m.
- the number of burners of the gas stove must correspond to a certain volume of the room (8 m3 - 2 burners, 12 m3 - no more than 3 burners, 15 m3 or more - 4);
- the speed and quality of air exchange in the kitchen is regulated by regulations. On average, it is 140 m3/h in a kitchen with a gas stove and 110 m3/h with an electric panel.
Scheme of operation of the kitchen hood
Installation of kitchen ventilation
Attention! Before making a ventilation plan for the whole house, it is recommended to find out the level of air pollution in the area where the house will be built, as additional air purification equipment may be needed.
For the most efficient air circulation in all rooms of the constructed building, holes are made that are responsible for the entry and exit of oxygen. According to accepted standards, the inlet is located above the foundation on the surface of the outer wall. The exhaust is done on the roof, and the pipe towering above the roof for the exit of polluted air is at least 0.5 m.
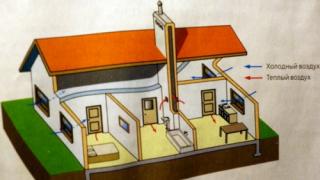
With a properly calculated ventilation system, the movement of air in the building will move through the ventilation from the rooms to the kitchen, from where it will be brought out (see the attached diagram).
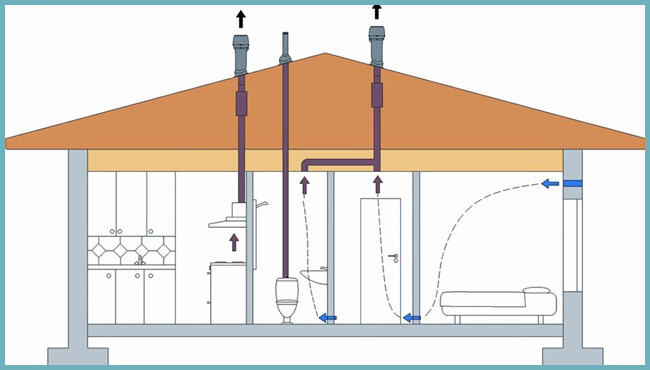
Air movement pattern
Pay special attention to studying the issue of the correct location of ventilation ducts, as well as the selection of high-quality materials. Using special engineering tables, calculate the length and width of the rectangular section of the channel, which would ensure a quick and complete removal of the exhaust air masses to the outside. During construction, the channel is mounted in the walls of the building.
The ventilation duct is recommended to be made of stainless steel. The walls inside the pipe-channel must be smooth so that soot deposits and greasy fumes do not cling to the burrs. This will make it easier for you to maintain ventilation. Indoors, all air duct openings are protected with special gratings to prevent foreign objects from entering them.
A little about natural ventilation
The system of natural (natural) ventilation of the cottage has certain differences from the hood in an apartment building. Here it is necessary to take care of good oxygen circulation in each room. Therefore, one pipe and one ventilation hole for a private house will not be enough. This is a whole system that consists of many pipes, passages and exits.
However, when designing and building a private house, many mistakes are often made. As a result, it turns out that air ventilation seems to be there, but in fact it does not work.
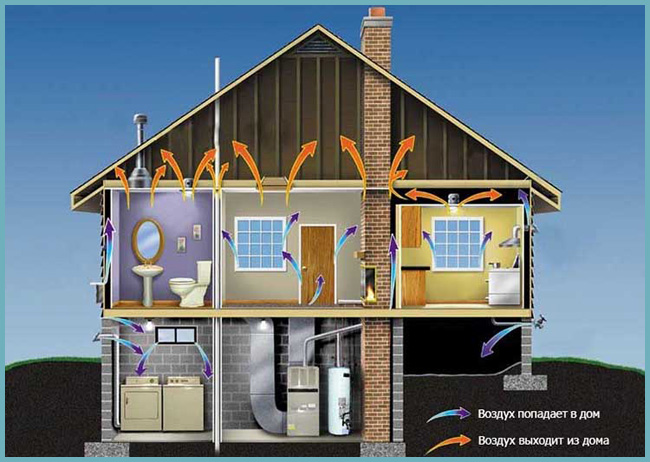
Natural ventilation of a private house
The main mistakes made in the design and installation of cottage ventilation:
- Incorrectly placed ventilation holes. According to the rules, they are placed at least 10 cm from the ceiling surface. In practice, they are located much lower, which leads to stagnation of warm waste masses near the ceiling.
- Insufficient height of the ventilation pipe leads to a stop in the movement of air inside the channel.
- Joint ventilation of neighboring rooms.
- The kitchen of a private house is often equipped only with forced ventilation, although according to the rules, a natural ventilation hole must also be present in the kitchen.
Attention! Natural ventilation is a simple and inexpensive way to provide yourself and your family with fresh oxygen, however, it must be done correctly.
A significant disadvantage of natural ventilation is that in the kitchen it is often not enough. This is especially felt in the absence of wind or during a hot period. Therefore, it is necessary to use additional specially installed devices that help increase the flow of fresh, purification and removal of exhaust air.
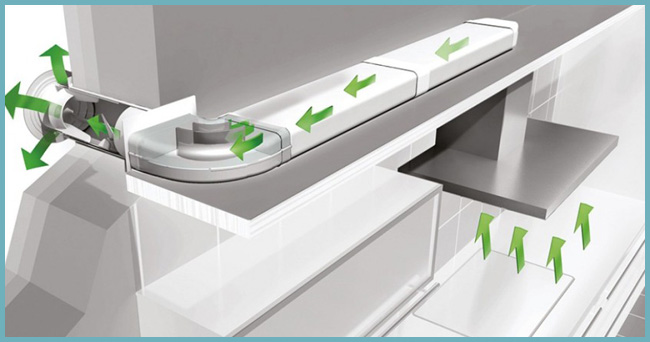
Forced ventilation in the kitchen
This type of ventilation involves the installation of special electrical equipment in the holes of the ventilation pipe, which will artificially drive air. In the kitchen, the easiest way is to install a conventional hood, powered by the mains and directing the exhaust air to the street. This option would be a good solution in a house with improperly designed ventilation. The kitchen hood is placed directly above the stove at a height of 60-80 cm, but not higher, otherwise it will not be able to cope with the work.
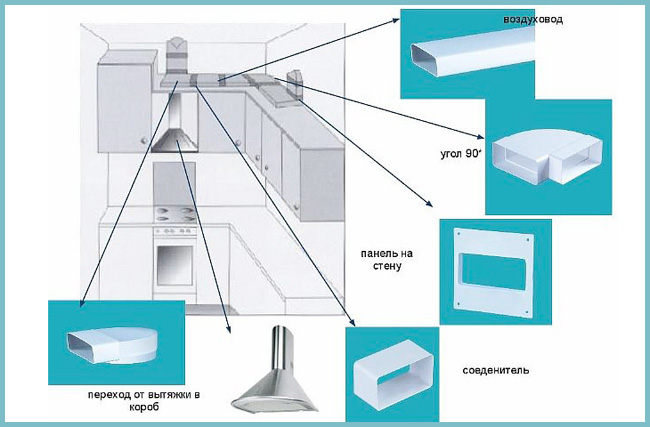
Scheme: forced ventilation device
A little more difficult is the option of creating a forced (artificial) supply and exhaust ventilation system, which will not only remove polluted air, but also contribute to the flow of fresh air at the same time. Thus, the kitchen will be part of the ventilation of the entire cottage. Also, if necessary, it is easier to equip the entire system with filtering and heating devices.
A significant drawback of artificial ventilation is its high financial cost and overly complex installation, which only specialists can do. However, having paid and installed such ventilation once, you will use it for a long time. In addition, it is more reliable and resistant to temperature extremes and variability of weather conditions.
What could be easier than installing a hood in the kitchen? I read the instructions and strictly followed what was written in it. We suggest that you additionally familiarize yourself with some tips that are not always found in the manual.